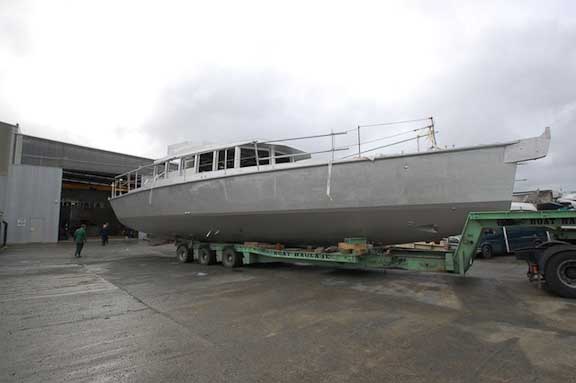
We’ve got lots of photos to share in this update so make yourself comfortable. We’ll start with FPB 64 #2 making a brief journey from the metalwork shop to the fitting out area.
This is the same truck which will take FPB 64 #1 to the water after the first of the year.
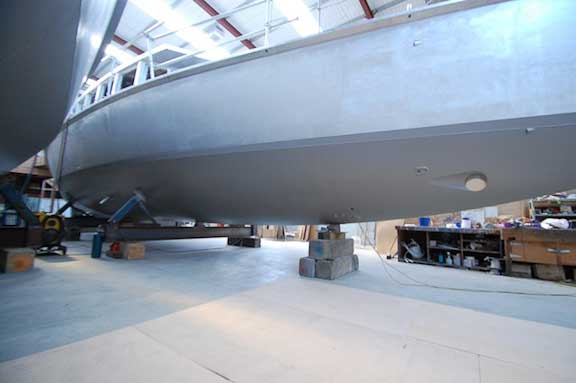
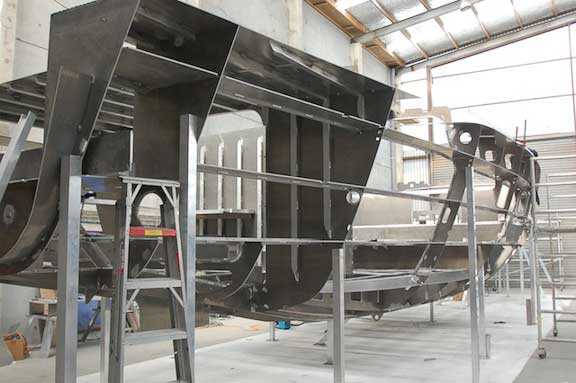
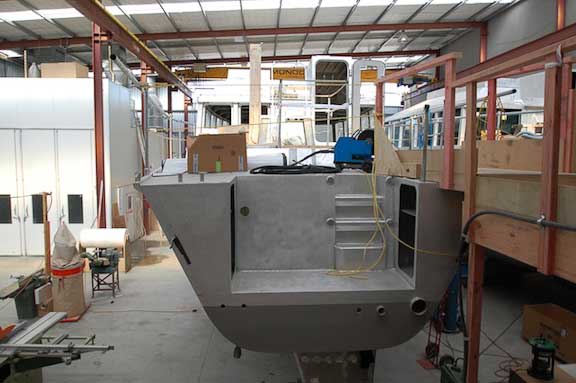
A clean look at the forebody shape. This is a very tough area to get right hydrostatically speaking.The tradeoff between a soft ride uphill and not locking in when running with big seas is critical.
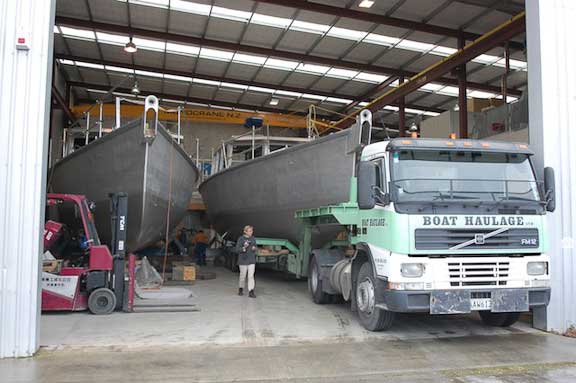
Number one FPB 64 is to the right, and the second boat to port.
Meanwhile, in a shed nearby, FPB 64 hull #3 is starting to shape up. Plating will start shortly.
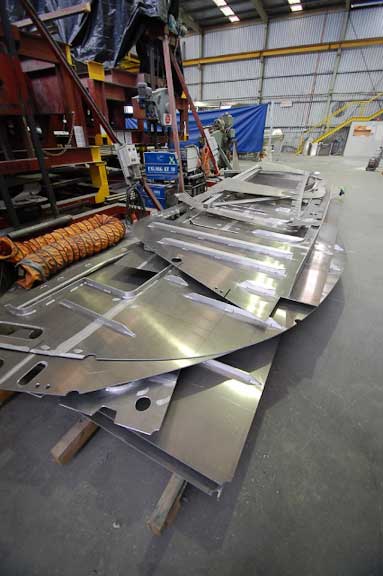
And the components for FPB64 number four are coming along.
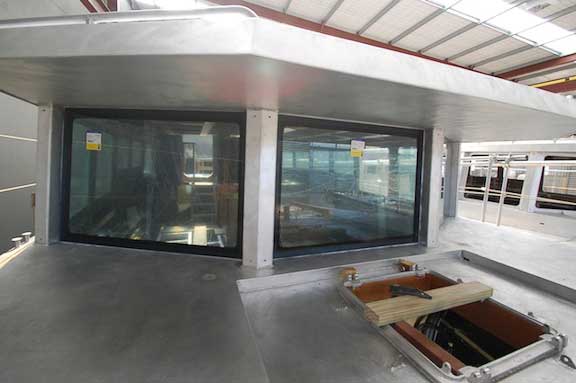
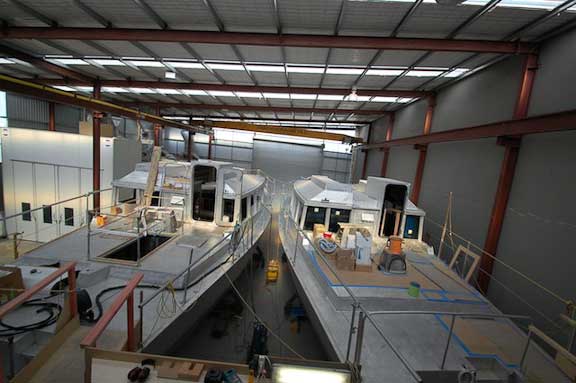
Another milestone, FPB 64 #1 has had its windows installed.

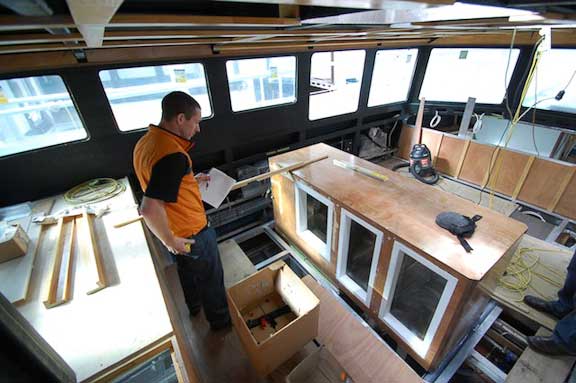
Most of the furniture modules are now complete and with systems now installed, furniture is starting to be dropped in. This photo is looking from the starboard aft corner of the great room. The galley is to the left, washer/drier cabinet in foreground right, and salon center to right in the background.
Galley starting to take shape. The fridge/freezer box is to the right, counter area for stove and drawer stack (not yet installed) is to the left. Sink and adjacent dishwasher/oven unit will go outboard under the windows.
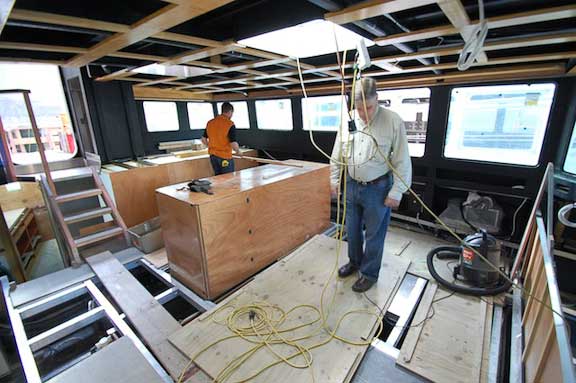
Looking from forward starboard corner aft across salon to galley. The gentleman in the center is six foot four inches (1.8m) tall.
Keep in mind that as spacious as these photos look, the area will expand enormously once the boat is afloat and you can see out of the windows.
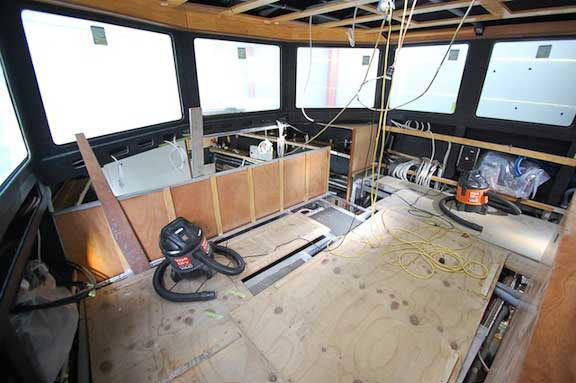
From the aft port corner of the saloon where the settee will go.
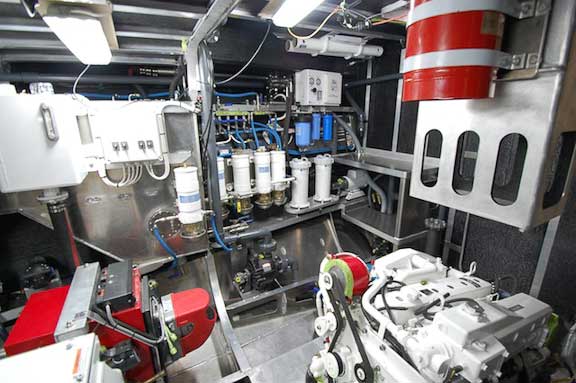
Moving now to an almost completed engine room. This is the view from the engine room door looking to port. The slotted obstruction upper to middle right is the air intake. This is designed so that even in a knockdown the engine room stays dry. The top of the slots are above the inverted flotation plane of the boat (not that we ever expect this to be needed!). There is a bottom to catch rain or spray and lead it to the bilge.
Still looking to port, now standing in front of the engine. The workbench will have a vice and a chest of tool drawers below. The salt water standpipe and dual strainers (either of which can feed the engine room) are in the foreground.
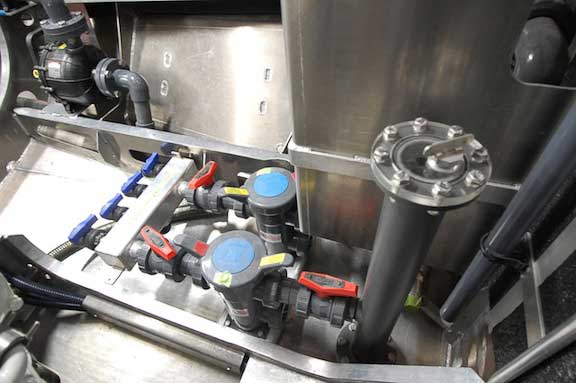
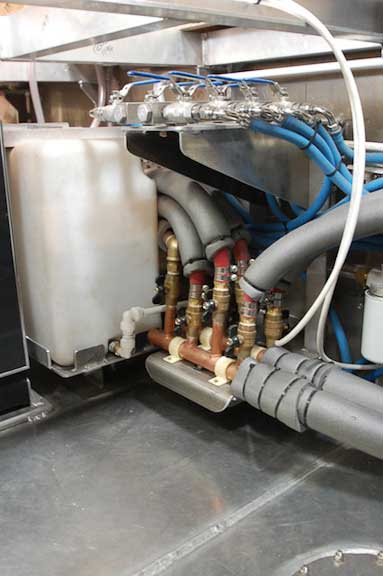
Strainers (blue tops) and manifold are detailed here. Each strainer can be isolated for cleaning and each consumer has its own shut off valve. Note the clear inspection top on the standpipe. The plug on top is for clearing debris. If a plastic bag is sucked in, pull the plug (which is above the waterline) and shove a stick down the standpipe to dislodge the obstruction.
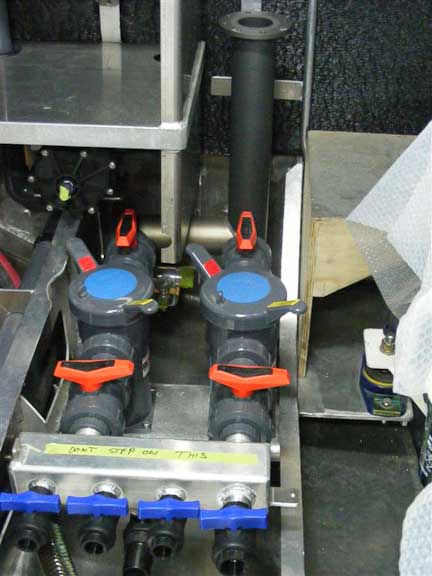
The salt water manifold from the aft side.The engine is to the right, almost out of the photo.
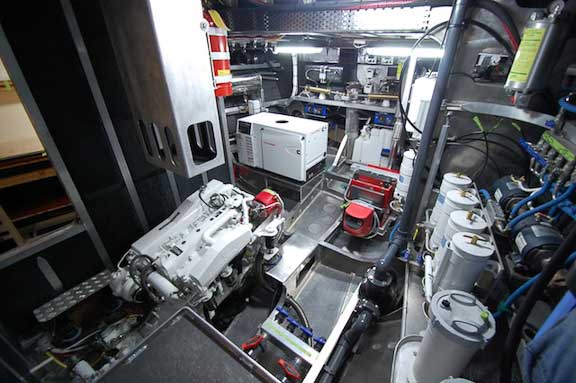
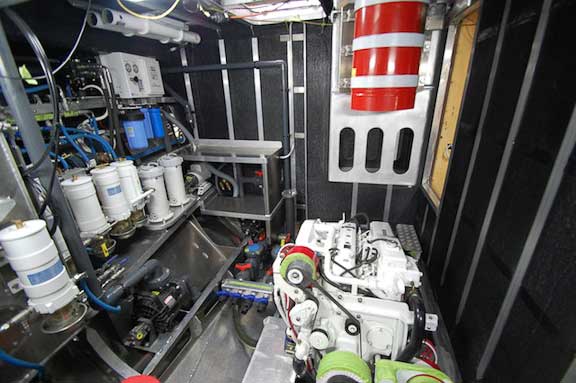
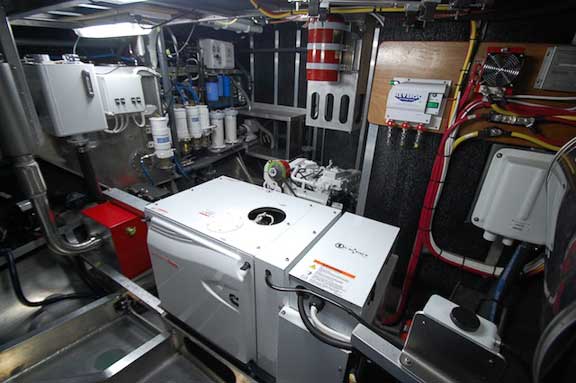
Resuming our general tour, looking now from the workbench aft. Air vent is over the engine, genset is in the background (white sound shield).

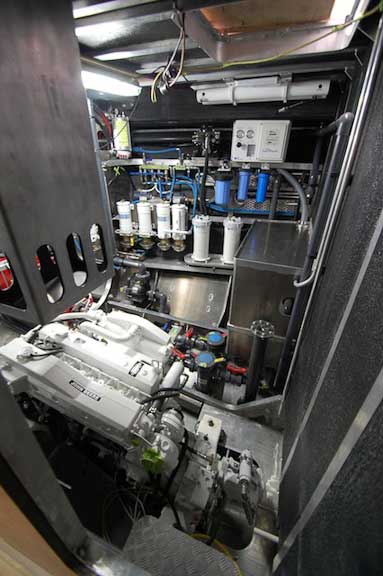
Swinging the camera to the right, the inboard corner of the workbench is in the photo. Watermaker and fuel system (fuel filters center of photo) with Kabola boiler (red) center left in background.
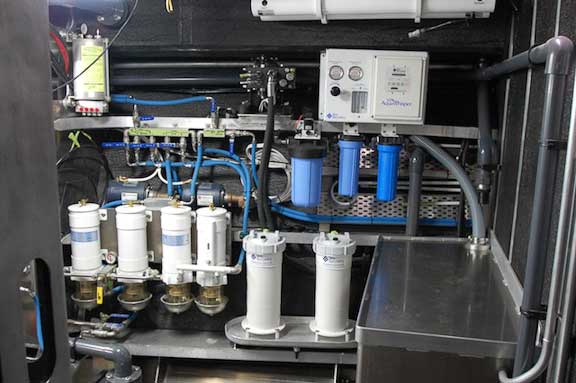
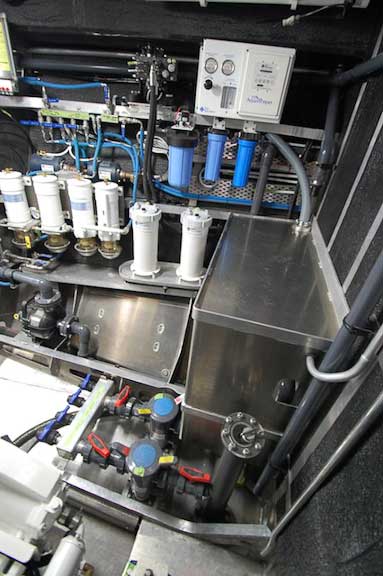
Focusing here on fuel system and watermaker. It looks a little complex but is actually quite simple to operate. The watermaker is well away from fuel pumps (these pumps are outboard of the fuel filters) in case there should be a leak in the watermaker plumbing.
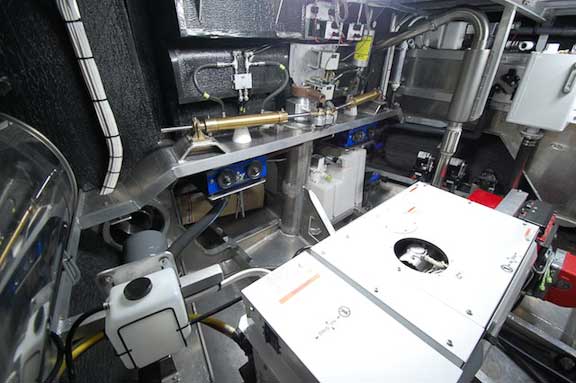
The camera has moved to the starboard aft corner of the engine room, between genset and aft starboard stateroom bulkhead. Air vent (slotted) with bottom of fire suppression bottle is to starboard with engine below. The Kabola boiler is to the left, adjacent to the edge of the genset sound shield.

Swinging the camera aft, the space between genset sound shield is clear.
Moving the camera further aft across the genset to the steering gear mounted on the shelf on the transom. The blue devices under the shelf are the autopilot hydraulic pump sets.
Looking forward here from the forward side of the genset. The workbench is in the background against the bulkhead.
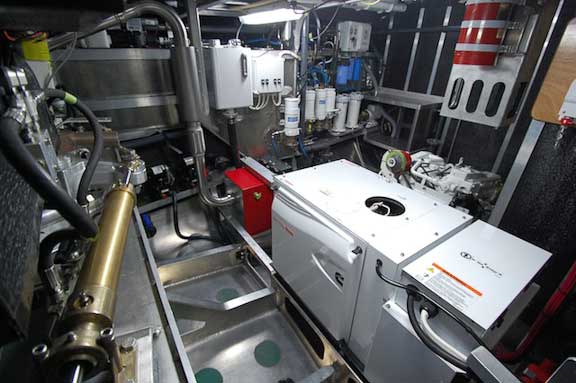
Now from extreme aft starboard corner, note the access around the genset and to aft side of boiler.
From the same camera position as the previous photo looking diagonally across the engine room.
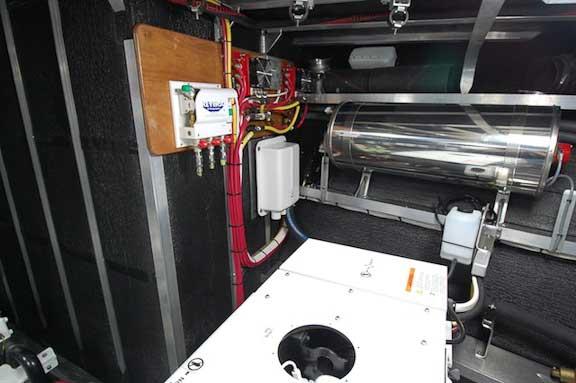
We are focusing from center of the engine room across the genset at the domestic hot water heater mounted under upper topside stiffener and the various items mounted on aft side of the starboard stateroom bulkhead.
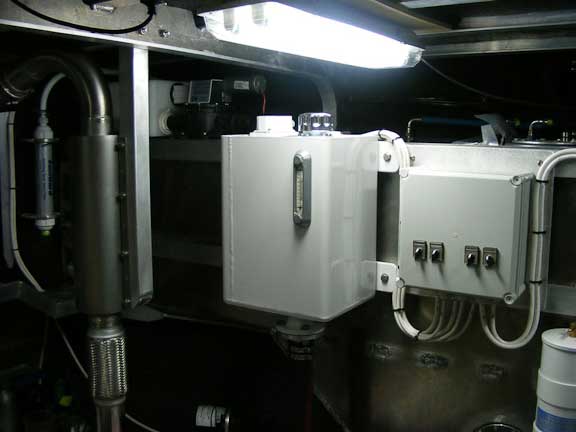
Final engine room photo. The box to the right is the day tank and fuel transfer pump control. Next to it is the hydraulic system reservoir.
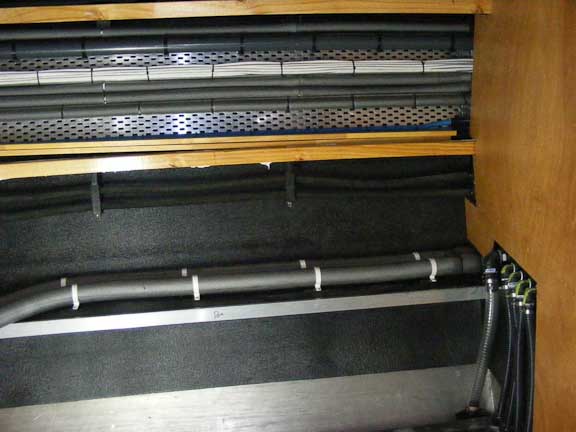
Moving to a few systems details in the interior. Plumbing and wiring are now essentially completed. Note the insulation on heater plumbing and domestic hot water lines.
In the basement, hot water from the Kabola boiler is distributed through the manifold at bottom. The fuel pick and and return manifold is at the top of the photo. The white tank is for drinking water, plumbed to the galley sink with a foot pump (as a backup).
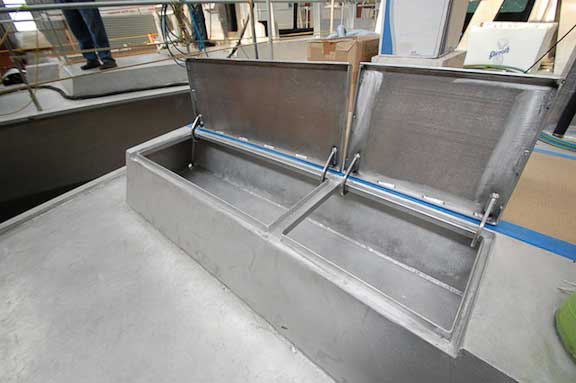
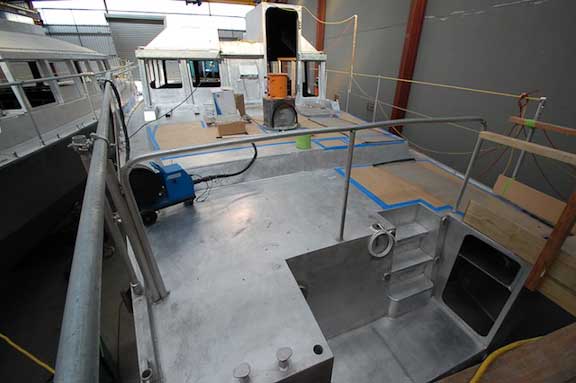
On deck now, this is the aft end of the raised deck area behind the house and aft of the bar BQ table. These lockers will come in handy for all sorts of items.
We’ve shown you the boarding platform and aft storage lockers before, but these views are a little different.
There is room in the boarding platform lockers for lots of outboard fuel and dive gear.

Finally, a test. Can you tell us what this plug in the rudder is for?

When the bolt is cinched up the surface of the plug is flush.

Want to pull your prop shaft without first dropping the rudder? That’s where the rudder plug comes into use.
Posted by Steve Dashew (August 26, 2009)
August 26th, 2009 at 3:29 pm
Hello again to you both (from Dartmouth) and another THANK YOU for sharing your experiences and also the details of the FPB.
I have followed your voyage with great interest and enjoy the humorous comments but particularly appreciate the latest photos of the engine room in the FPB update for I know from experience just how difficult it is to plan and coordinate the various systems so that everything is accessable and logical.
My wife and I hope to leave for Spain in our rather elderly motoryacht in about six weeks time and I cannot imagine why you would want to remain in these waters with our ghastly weather any longer than necessary so I assume you will head South when you get to Falmouth, but I shall continue to watch your site and hope that one day we may meet up for people with your depth of experience are few and far between.
Thanks again and good luck to you both
Sid Fisher
August 28th, 2009 at 4:10 am
Hi Sid:
We will be in Falmouth within a few days and Dartmouth probably in a week. Agree on your weather! But we are wintering again in Lymington at Berthon’s.
August 27th, 2009 at 7:21 am
Steve,
I noticed the main engine exhaust is missing from these pictures…are you re-routing due to the position of the air intake? It also looks as though navigating around the engine in a sea way and having to stay clear of the sea strainers as you step around the engine could pose a challenge…is that just optics?
the boats look amazing by the way
Scott
August 28th, 2009 at 4:08 am
Howdy Scott:
The sea strainers and manifolds are below sole level. There is lots of room between the engine and the systems laid out down the port side. Exhaust manifold on the engine after fitting was removed until the engine room is completed.
August 29th, 2009 at 8:48 am
Hi.
I’m really enjoying watching the boat grow but am puzzled by one thing and have a couple of questions.
The rudder plug that allows the prop shaft to be pulled doesn’t seem to be in vertical alignment with the rudder shaft. That would make the rudder shaft or the prop shaft not on the centerline of the boat. Optical illusion or am I missing something?
And the questions: Are the lockers on the aft deck deep enough to take the outboard, is there dedicated drawer space for plenty of paper charts and will once folded Admiralty, N.O.A.A. and N.G.A. charts fit on the bridge bench?
Thanks and regards.
Bob.
August 30th, 2009 at 1:35 pm
Hi Bob:
The prop shaft is on center. The alignment and diameter of the rudder hole combine to allow the prop shaft to be withdrawn through the rudder.
The aft deck lockers are not large enough for an outboard (but there is space in the forepeak). These are primarily for drogue storage with attached rodes. For example a Jordon Series Drogue might be carried on one side and a Galerider and its rode on the other. Or deck hoses, dock lines, etc.
Dedicated chart storage is always a tradeoff. Today, with most boats having gone to PCs or dedicated plotters, we usually make other provisions. For example, on Wind Horse we carry our current region in basement bins, while other regions are stored in canvas bags (we have a huge number of paper charts aboard).
August 31st, 2009 at 4:55 am
Hi Chris:
The FPB64 decks are being done with Treadmaster. It provides an excellent non skid surface, the primary requirement, and wears well (we inspected a six year old deck on the Kelly Archer build Onora this summer and it looked in very good shape).
August 31st, 2009 at 7:12 am
Steve,
Won’t the application of a Treadmaster surface create the same set of corrosion issues as paint for an aluminum deck. I am not aware of how the Treadmaster is applied, but I would imagine with some sort of covering adhesive.
thanks
Scott
August 31st, 2009 at 3:33 pm
Hi Scott:
Paint and aluminum get into difficulty over time around dissimilar metals. However, on the FPB 64 there are no fittings on the deck around the non skid. All stainless and bronze (the latter in winch bases), where these do occur, are dielectrically isolated from the aluminum. We’ve been using the same approach for almost 30 years now and it works well.
September 1st, 2009 at 10:45 am
Hi!
It looks like the strainers and shut off valves are made of PVC. If this is true could you explain why?
September 1st, 2009 at 12:06 pm
Hi Jan-Eric:
We have been using schedule 80 PVC on manifolds for more than two decades. We typically use Marelon for sea cocks. This material is not subject to corrosion as is bronze or stainless, and we have had good experience with it. There are two drawbacks, however. One is with the risk of fire, and the second with freezing. Our take on this is that these risks are substantially less than that posed by salt water corrosion when using bronze or stainless.
September 1st, 2009 at 11:53 am
Dear Steve.
I have read a great deal of yours and Linda’s articles. I am 5 realistically years away from retirement and the more I read the more I am convinced that your approach is the one that make sense for me. I used to race monohulls, got in love with Catamarans, but in 5 years I will be 60 and for extensive time at sea, the FPB makes more sense. My question is: After you retire, do you think FPBs will still maintain the same quality when constructed by others?
Congratulations to everyone involved.
Homero
September 1st, 2009 at 1:01 pm
Howdy Homero:
Thanks for the kind words.
Re what happens when we retire, there are several answers. The first is to get the results we are after takes a team effort from our end (Todd Rickard and myself) and in New Zealand with Circa and Kelly Archer. Second, I suspect it will be a long time before we shake the boat building bug.
September 2nd, 2009 at 7:51 pm
Steve (and Todd)
Great update and great boat – I’ve been following FPB developments since day 1.
Regarding engine roof ventilation – do you pressure it positively with powered fans (and drift eliminators), and if so where do you exhaust the air? Lastly, what’s the engine room temp of your boat while underway?
All the best,
John
September 4th, 2009 at 1:44 pm
John:
Engine room temperature is usually around 10 to 20 degrees F above ambient. Because we need so little air (the result of low power requirements) we can use passive ventilation. This is much quieter and simpler, and there is no fan blocking the air inlet when the fan bearings//motor fail.
September 7th, 2009 at 2:10 am
How are the windows fixed?
Are they glued?
September 7th, 2009 at 7:55 am
Hi Jan-Eric
Fixing windows, especially large ones, needs careful attention. The windows on Wind Horse (FPB83) and the new FPB 64s are glued in place using a structural adhesive. Properly done, this creates a strong bond with enough flexibility to take care of thermally induced changes in shape.
October 24th, 2009 at 6:56 am
Hello to you both and thank you very much for sharing your valuable experiences and knowledge.
We have followed your voyage with great interest and enjoy also the comments and humorous details.
We need some information on what is the proper way to glue down Treadmaster on bare aluminium deck, in order to complete seal it from sea water and be sure that stays there, in hot climate.
Can you specify the preparation of the surface, prior applying the adhesive and what kind of adhesive you use?
Treadmaster’s internet site does not describe any primers, despite others that are proposing the use of the West System two part aluminium etch and then glue it down with West System epoxy slightly thickened with colloidal silicate.
There is also an limitation for the above solution, because is no possible to find the West’s 860 two part etch product, in Europe.
We will appreciate if you can propose specified materials.
Thanks and regards,
George
October 24th, 2009 at 12:06 pm
Howdy George:
We do have a FPB 64 headed to the Seattle area.
I looked at the website for the dinghy. Interesting craft, although it would only be useful as an emergency vehicle in protected waters.
December 4th, 2009 at 4:08 pm
Howdy George:
You have raised a difficult question. The best information we have is what Kelly Archer used for the Treadmaster on Onora, which is now in its seventh year of cruising (she was looking good when we were together last summer in Tromso, Norway). After a profiling (grinding) of the aluminum deck a material called Tec Flex was used as an adhesive. This is no longer produced, but was described as “TEC FLEX LM POLYURETHANE SEALANT is a high performance, 1-part polyurethane construction sealant” in the specification sheet.
The supplier, HB Fuller in Australia, has a replacement product which they recommend, called”Toolbox Adhesive Sealant”.